
Para este post vamos a usar Twingly como ejemplo, que es un servicio que funciona para hacer ping para notificar que el contenido de nuestro blog fue actualizado, usa el protocolo XML-RPC y el formato de documentos con XML para procesar la información.
Month: mayo 2021
Para este post vamos a usar Twingly como ejemplo, que es un servicio que funciona para hacer ping para notificar que el contenido de nuestro blog fue actualizado, usa el protocolo XML-RPC y el formato de documentos con XML para procesar la información.
Para este post vamos a usar Twingly como ejemplo, que es un servicio que funciona para hacer ping para notificar que el contenido de nuestro blog fue actualizado, usa el protocolo XML-RPC y el formato de documentos con XML para procesar la información.
Encontré una pequeña librería para php que sirve para trabajar con twitter que fue escrita por David Grudl. Realmente es increíble lo simple de usarla. Acá les cuento un poco más.
Encontré una pequeña librería para php que sirve para trabajar con twitter que fue escrita por David Grudl. Realmente es increible lo simple de usarla. Acá les cuento un poco más.
Encontré una pequeña librería para php que sirve para trabajar con twitter que fue escrita por David Grudl. Realmente es increible lo simple de usarla. Acá les cuento un poco más.
Hace ya algún tiempo que tengo los Audífonos TaoTronic TT-BH22 con cancelación de ruido, y puedo decirles que para ser de la gama económica me han funcionado a la perfección. La batería tiene una muy buena duración (unas 40 horas de uso continuo) y la cancelación de ruido, aunque no es al 100% como audífonos de mayor coste, es más que aceptable.Sin embargo, cuando los compré no me percaté de que tenían un micrófono integrado, y creo que durante el primer año de uso dejé esta característica olvidada y desaprovechada, ya que mi Sistema Operativo no lo reconoció de inmediato. Lo triste, no fue sino hasta que mi esposo los probó en su maquina y su sistema los reconoció de inmediato que nos dimos cuenta.
¿Más triste aún? Ambos usamos el mismo sistema operativo… así que era momento de poner manos a la obra y averiguar porque en su maquina si funcionaba y en la mía no, así que si alguien se ha encontrado con este problema, acá les dejo una solución que en teoría, debería funcionar con todos los audífonos de características similares.El problema radica en lo siguiente: Como estos audífonos son un dispositivo con calidad de audio de alta fidelidad (Hi-Fi) el sistema operativo los reconocía como tal y «asumía» que no venían con micrófono, eso era todo el problema.
Ahora, la cuestión era un tema de configurar apropiadamente el tipo de audífono, sin embargo, el manejador de Bluetooth de KDE (en mi caso) es demasiado sencillo y no permitía configuraciones más avanzadas, por lo que instale blueman, que es el gestor de configuraciones de Bluetooth de Gnome con el cual sé que puedo configurar mejor mi periférico sin tener que irme a los archivos en la consola. Instalamos blueman como root:[root@libro ]# dnf -y install bluemanY ya con esto podemos ir a configurar mejor nuestros periféricos Bluetooth. Abrimos la app y lo primero que vemos es el listado de los dispositivos que usamos frecuentemente.
- En la lista ubicaremos nuestros audífonos, y daremos click derecho para ver el menú de este periférico.
- Seleccionaremos la opción «audio profile» (perfil de audio).
- Seleccionaremos la opción Headset Head Unit (HSP/HFP).
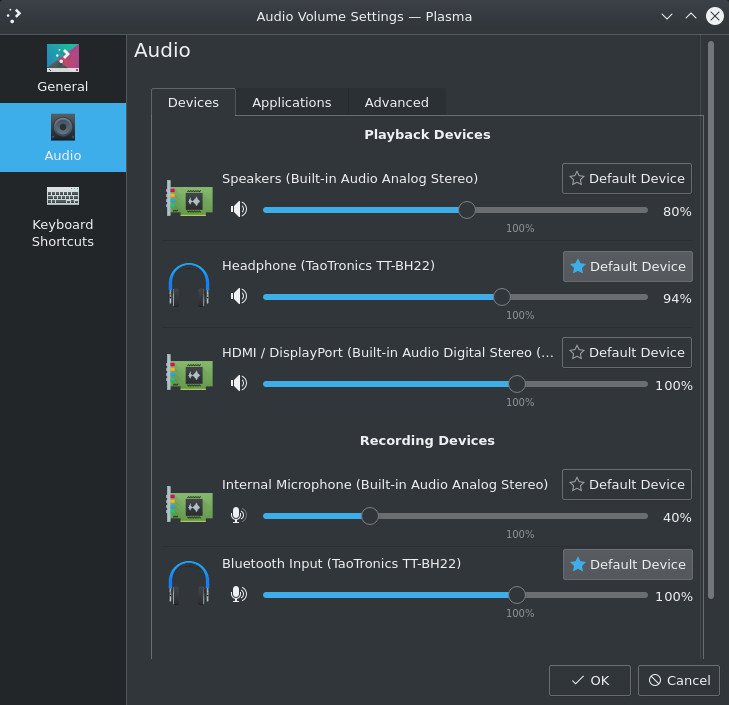
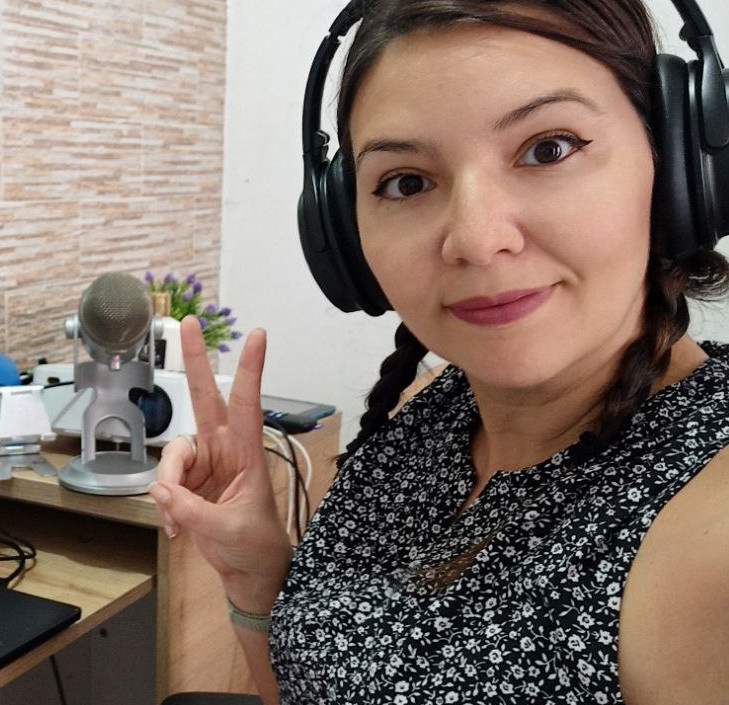
Y eso es todo, ya deberías poder ver tu micrófono entre la lista de dispositivos de audio que puedes seleccionar.Ahora niña feliz que puede pasear por la casa mientras se prepara un café en medio de las infinitas reuniones que el trabajo remoto ahora te obliga a tener.
Me cuentan si les sirvió, y sobre todo, con que audífonos para ir haciendo la lista de dispositivos probados y funcionales.
- TaoTronics TT-BH22
This post has a nicer formatting that can be seen at it's original source at tatica.org , so feel free to hit the link and read better version!
I’ve owned a TaoTronic TT-BH22 headphones with noise cancellation for a while ago, and I can tell you that despite being quite cheap have worked perfectly for me. Battery life is fantastic (around 40 hours) and noise cancelling, even if it’s not 100% perfect as the professional ones, is more than acceptable.

However, then I bought those I didn’t realize that they had an integrated microphone, and I think that during the first year of use I left this feature forgotten and unused since my SO didn’t recognized it right away. Sad thing is, it wasn’t until my husband tried them on his laptop and his SO recognized the microphone, that we knew about this.
And even sadder than that? We both use the same SO… so it was time to work around this and figure out why it was working on his laptop and not on mine, so if anyone has encountered an issue like this, here’s a solution that should work with every headphone with a built in microphone just like mine.
All problem was this: Like this headphones have a high fidelity sound (Hi-Fi) my system didn’t recognized them as regular headphones and “assumed” they didn’t had a microphone, that was it…
Now it was just time to configure correctly the headphone type, however, KDE’s Bluetooth config app is too simple and doesn’t allow more advanced settings, so I installed blueman, which is Gnome’s Bluetooth settings app and allowed me to configure easily my little gadget without going to the terminal. So lets install blueman as root:
[root@libro ]# dnf -y install blueman
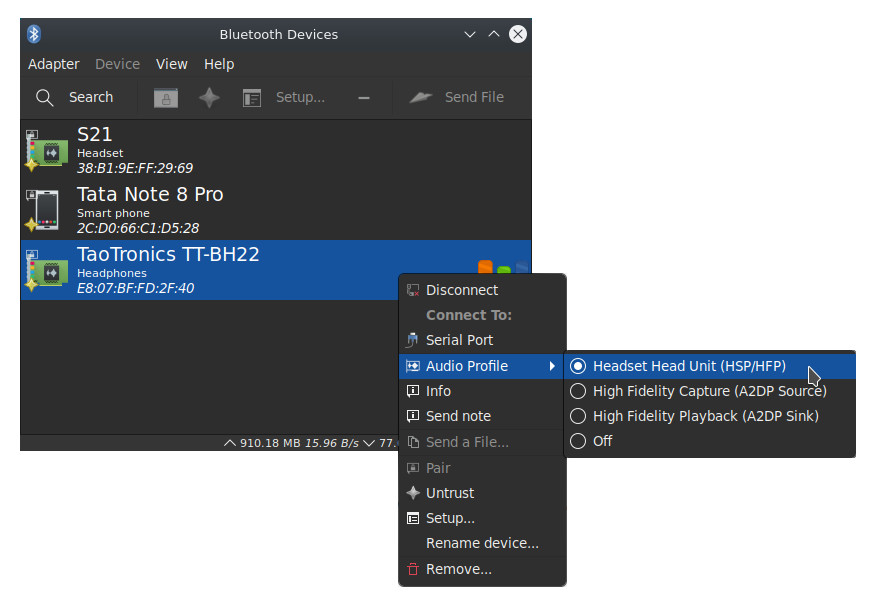
And with this app we can configure our Bluetooth devices better. when we open the app the first thing we see is the list of recent devices.
- We will locate our headphones on this list and right-click it to see the menu.
- Will select the option “audio profile” .
- And finally select the option Headset Head Unit (HSP/HFP).
And that’s it, you should be able to see your microphone between the audio device list and select it.
Now this happy girl can walk around the house while makes herself a coffee in between the million meetings we have now during this pandemic.
Let me know if this worked for you, and specially, which headphones did you configured so I can add them to this list.
- TaoTronics TT-BH22
This post has a nicer formatting that can be seen at it's original source at tatica.org , so feel free to hit the link and read better version!
Cuando estamos creando un libro para ser publicado en la tienda de Amazon Kindle y pensamos que va a ser publicado no solo en formato digital, pero también impreso, hay que tener algunas consideraciones importantes a la hora de crear dicha portada.
No solo se trata de tener una portada atractiva que anime a los lectores a realizar la compra, sino también debe ser funcional con respecto al contenido, el tipo de papel e incluso, el grosor mismo del libro. En fin, la idea es crear una portada que funcione y que no sea rechazada por el sistema de verificación automático de Amazon.
A la hora de elegir las propiedades de nuestro libro, no solo tenemos una enorme variedad de tamaños disponibles, sino que también tenemos que decidir si será blanco y negro, o versión a color. Adicional a ello debemos escoger el grosor y calidad del papel para poder tener el estimado de tamaño y de precio.Para este ejemplo, supondremos que estamos creando una portada para un libro de 6″x 9″ (15.24 x 22.86 cm)Lo mas importante al crear una portada serán las dimensiones, ya que no sirve de nada tener una portada fabulosa que se corta, no se ve legible, o está mal ubicada. Para ello utilizaremos un sitio web que hará los cálculos necesarios por nosotros:Supongamos que tenemos un libro de 100 páginas, y usaremos el tipo de papel Blanco para impresiones a color.
Este tipo de hoja tiene un grosor de 0.002347″ (0.00596138cm)La web nos permite varias opciones que incluyen pre-formatos para comenzar a escribir nuestros libros, Generador de código de barras para ISBN (código del libro), pero la opción que necesitamos es la del generador de portadas de KDP (KDP Cover Template Generator)Acá procederemos a ingresar los datos que nos piden en cada una de las casillas de la siguiente forma:
- Width (Ancho): 6
- Height (Alto): 9
- Page count (cantidad de páginas): 100
- Paper type (tipo de papel): acá seleccionaremos papel blanco para impresiones a color – white colour
- OPTIONAL ISBN-13: Si no tienes ISBN, no lo agregues. Puedes gestionar uno automáticamente con Amazon KDP
- OPTIONAL Price Barcode: Igual, si no tienes la información del código de barras, déjalo blanco.
- Formats (Formato) Selecciona las que están en negritas, que usualmente ya están pre-marcadas
- PNG
- IDML (InDesign)
- SLA (Scribus)
- ODG (OpenOffice)
- Your email address (tu correo electrónico): hola@gmail.com
- Your email address (again) (tu correo electrónico de nuevo…): hola@gmail.com
- Consent to email: Marca la ultima casilla para dar consentimiento al envio del documento a tu correo electrónico.
Finalmente da click en el botón de «Email Cover Template» y esto te desplegará un popup con la opción de dejar un donativo. Recuerda siempre que puedas donar algo a estos sitios ya que funcionan única y exclusivamente bajo la generosidad.
Si no puedes donar algo, simplemente selecciona la primera opción que dice «No thanks, just email me the template» (No gracias, solo envía el template a mi correo).Al aceptarla donación (o no) terminarás el proceso visualizando nuevamente la página de donación, esta vez con un mensaje de éxito. Ya puedes ir a tu email y descargar el png y el pdf con tu encuadre. Ahora voy a abrirlo con inkscape para diseñar mi portada.Agregamos nuestra maqueta a inkscape y ajustamos las dimensiones del documento a las de la imagen. Esto nos permitirá tener el tamaño de la hoja incluyendo los margenes de corte que tantos dolores de cabeza nos dan siempre.
Diseñaremos nuestra portada procurando que el contenido «importante» como títulos, imágenes, descripción, espacio para el ISBN (en caso de que en un futuro lo necesites) y demás espacios demarcados se respeten.Es importante mencionar que la parte que quizás olvidamos es el nombre que va en el lomo del libro. Debes asegurarte de que este texto esté dentro de la franja blanca en el centro (sin tocar los bordes) para que pase el filtro de Amazon KDP.Para mayor comodidad, yo coloqué la imagen de margenes con un 60% de opacidad para poder tenerla encima de todos los elementos y visualizar mejor la posición correcta de cada cosa, pero es solo una recomendación personal.
Finalmente, una vez estés satisfecho con tu diseño, solo debes eliminar la imagen de guia y exportar tu portada a 300DPI en formato png y ya estarás listo para cargarla a Amazon KDP.Cuéntame que te pareció este tutorial y si te sirvió para crear más fácilmente la portada de tu próximo libro!
This post has a nicer formatting that can be seen at it's original source at tatica.org , so feel free to hit the link and read better version!
When we are creating a book that will be published at Amazon Kindle Store and we want it to be printed as well as digital, we need to have some important considerations when comes to create the cover.
It’s not just about having an attractive cover that encourage readers to buy, but it also has to be functional when comes to content, paper type and even the thickness of the book itself. Anyway, the idea is to have a working cover that won’t ve rejected by the automated verification process that Amazon holds.
When comes to select our book properties, we not just have a wide sizes variety, but also we have to decide is it will be printed on black/white or color. Besides, we will have to choose the thickness and quality of the paper, so we can begin to estimate the size and cost of our book.
For this example, we will assume we are creating a cover for a 6″x 9″ (15.24 x 22.86 cm) book
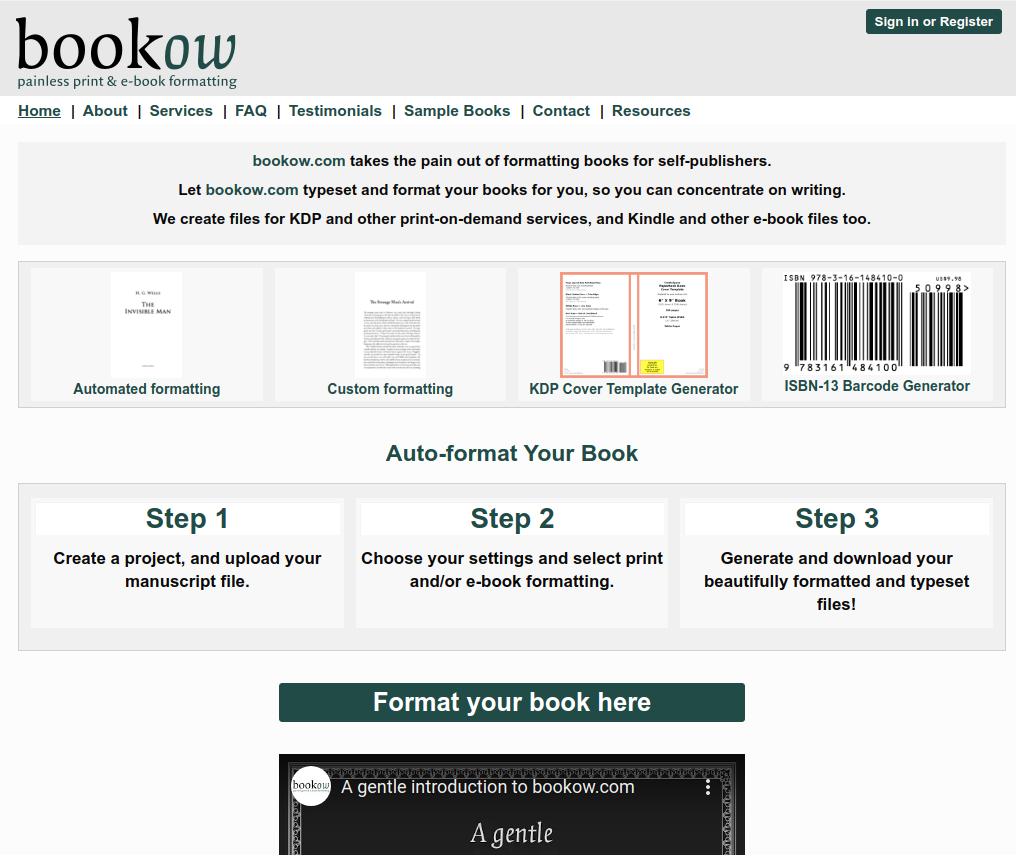
The most important when comes to create a book cover are the dimensions, since it won’t matter to have a fantastic cover that crops, is unreadable or is misplaced and not aligned correctly. This is why we will use an online service that will help us run the necessary calculus to save time and effort:
Lets asume we have a 100 pages book, and we will use a White paper for color impressions.
This type of paper has a thickness of 0.002347″ (0.00596138cm)

This web allows us to play with several options that include pre-formats to start writing our books, generate the ISBN bar code, but the option we really need is the KDP Cover Template Generator. So click on it
On this form, we will have to fill the data requested on each field just as follows:
- Width: 6
- Height: 9
- Page count: 100
- Paper type: select white colour
- OPTIONAL ISBN-13:Leave this in blank
- OPTIONAL Price Barcode: Just leave this in blank
- Formats: Select the ones that I put on bold, which are usually already marked
- PNG
- IDML (InDesign)
- SLA (Scribus)
- ODG (OpenOffice)
- Your email address : hi@gmail.com
- Your email address (again): hi@gmail.com
- Consent to email: Check this last field to consent that you want them to send you an email.
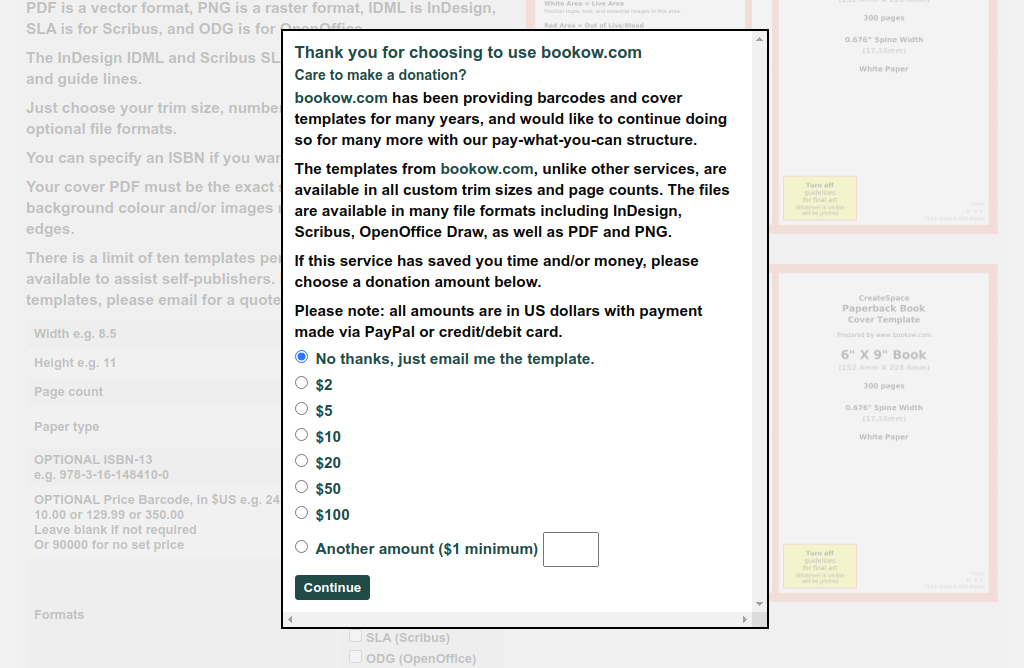
Finally click on the “Email Cover Template” button and this will display a popup with the option to leave a donation. Remember to always leave a tip if you can since this services don’t have funds beyond their own users.
If you can’t make a donation, then simply select the first option that says “No thanks, just email me the template” .
Either you make a donation or not, you will finish the process with this donation page again, but this time with a success message that ask you to check your email and download your guides. Just do so and download either the png or pdf with the desired layout. I’m gonna open it with inkscape to start designing my cover.
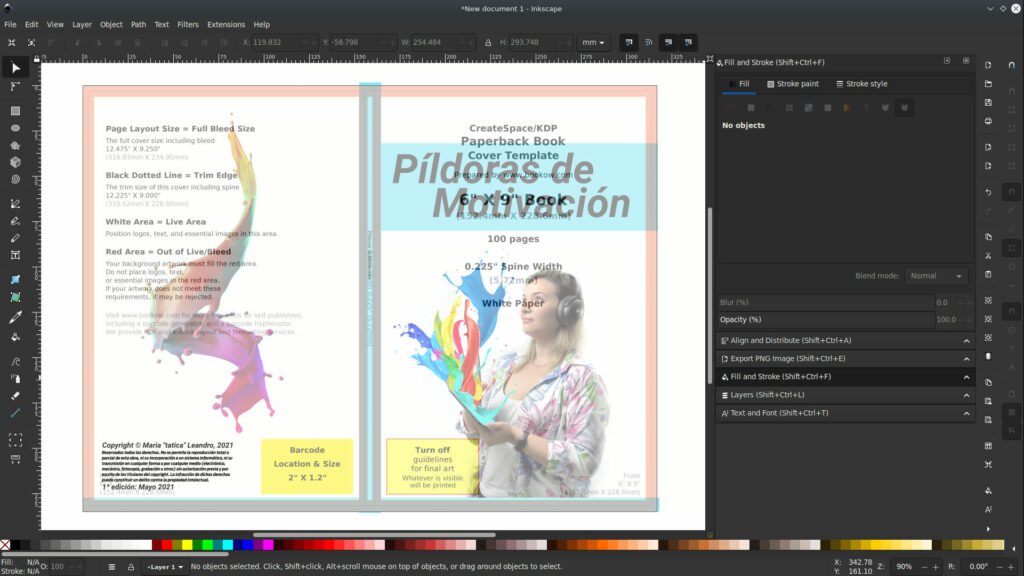
We add the image with our layout to inkscape and adjust the size of the canva to the one at the image (the outside). This will allow our design to already include the cut margins or bleeds that always give us a headache.
We will design our cover following the guide lines and respecting the margins, only writing our content on the white parts of the layout. We will include our title, images, description but remember to leave the space for the ISBN since Amazon will add it automatically in case you don’t have one.
It’s important to mention that the section we usually forget is the name at the book mold. Make sure that this text is within the white line at the very center of the layout without touching the red border so it pass the Amazon KDP filters.
To work more comfortably, I set the layout image to a 60% opacity and put it on top of everything, that way I was able to see every element below the layout and move them better. But this is just a personal recommendation.
Once happy with your design, just delete the layout image, export your cover at 300DPI and you will be set to upload it at Amazon KDP.
Let me know if this tutorial was useful and if you created your book cover easily with this tips!
This post has a nicer formatting that can be seen at it's original source at tatica.org , so feel free to hit the link and read better version!