
Debido a que mi suegra es diabética e insulinodependiente, requiere llevar un control diario estricto de sus niveles de azucar todos los días. Es por eso que (por 2do año consecutivo) le hice nuevamente su calendario de registro, esta vez mucho mas bonito que el año anterior…. en serio fue feisimo!!! En fin, no sé...Read More
Category: General
Si miramos la evolución constante que sufre del diseño web, fusionar la la experiencia del usuario (UX) y la interfaz de usuario (UI) se ha vuelto primordial. Elaborar un diseño web que integre a la perfección ambos elementos es la clave para ofrecer experiencias digitales que cautiven e involucren a los usuarios. En este post,...Read More
Esta es una característica que te permite ahorrar tiempo y esfuerzo en la gestión de tus redes sociales. En este tutorial, te explicaré cómo programar tus tweets de manera fácil sin la necesidad de utilizar otras aplicaciones como Hootsuite y similares. Primero ingresa a tu cuenta de Twitter y accede a la sección de «Programar...Read More
En la era de la información en la que vivimos, las redes sociales se han convertido en una herramienta indispensable para la comunicación y el marketing. Pero, ¿qué pasa cuando se trata de generar contenido de calidad y de manera eficiente? Aquí es donde entran en juego aplicaciones como ChatGPT y MidJourney, y otras herramientas...Read More
Cuando estamos diseñando, es importante optimizar no solo la velocidad sino el esfuerzo. Es muy fácil que comencemos un diseño simple y se termine convirtiendo en algo complejo en cuestion de minutos, es por eso que te dejo este tutorial para optimizar el flujo de trabajo usando Componentes. Y si quieres leer en vez de...Read More
Hace tiempo venía con la idea de armar unos libros de trazado para mi hijo y ayudarlo en su proceso de aprendizaje escolar, y pese a que hay una enorme variedad de libros en el mercado, como buena diseñadora y mamá necia, me dispuse a hacer mis propias guías basadas en o que le gusta...Read More
¿A quién no le ha tocado sufrir cuadrando donde cortar sus fotos para las redes sociales? No es un secreto que el éxito de una imagen reside en su composición, así que mira esta lista para que sepas las dimensiones de las principales redes sociales, bien sea para cortar tus fotos, o crear diseños publicitarios....Read More

Solo deben copiar el siguiente texto y pegarlo en la sección [global] de su archivo de configuración, generalmente /etc/samba/smb.conf
   workgroup = WORKGROUP
   security = user
   strict allocate = Yes
   read raw = Yes
   write raw = Yes
   strict locking = No
   socket options = TCP_NODELAY IPTOS_LOWDELAY SO_RCVBUF=131072 SO_SNDBUF=131072 SO_KEEPALIVE
   min receivefile size = 16384
   use sendfile = Yes
   aio read size = 16384
   aio write size = 16384
   log level = 1
   oplocks = yes
   dead time = 15
   getwd cache = yes
Luego de grabar el archivo se procede a reiniciar el servicio con el siguiente comando:
systemctl restart smbd.serviceY listo, con esto obtendremos una mejora en el rendimiento de aproximadamente 15%.
Espero que esta información les sea útil, saludos…
The truth is that the digital age has its pros and cons. As pros we can obviously count the speed with which the information is distributed and how easy it can be read by anyone, but when we look at the cons, it is very easy to create news that seems real and distribute them. It here where we can perform a couple of verifications to check if a new is real or not, and what better way to explain it than with an example … lets go!
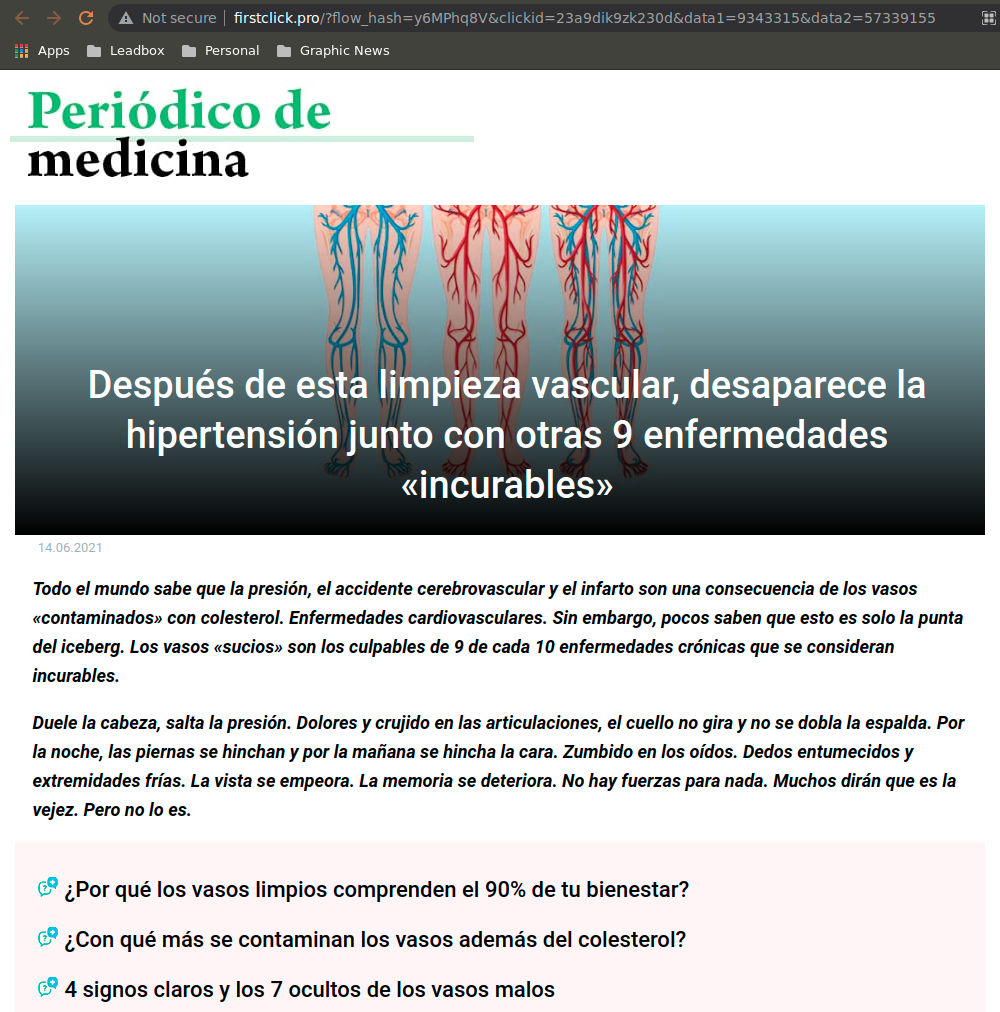
Suspicious Links
First thing we saw is that this link was obviously not coming from any known news portal, it doesn’t even has a name to make us believe such a thing. And not just that, if we click on the link itself, it gives us a 404 error, so they didn’t even put some effort into making a front-page.
Additionally, the logo of the so-called “newspaper” is also not clickable, which indicates that you can’t even see if they have any other articles. We realize immediately that this article was hand-made.
Finally we realize that the url includes a flow_hash that is nothing more than an algorithm for data collection, which sends a lot of your data for analysis once you click it and that they are probably monetizing this link (either charging for advertising or PPC)
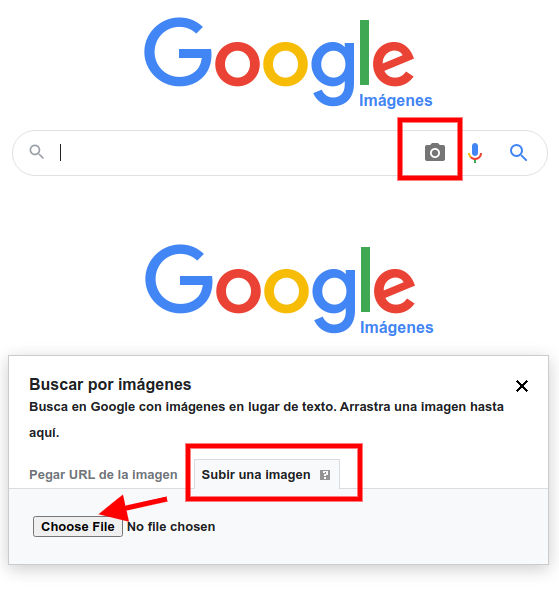
Fake Doctor
They speak about a certain Miguel Suarez, who is part of the Department of Vascular Surgery at the National University of Medicine. practicing neurosurgeon, honored physician from Colombia. And here we realize of the scam, because in the article they do not call him “Doctor” but “Sr” … Did you notice?
In addition to this, it should be noted that they added a fabulous photo of Mr. Suarez to get along with the article, but there is a very easy way to verify if this photo is actually from who they talk about. All we have to do is this:
This will perform a search based on images and not on content where you can see which portals are using the same photo. The logical thing would be to find many photos of this Suarez in different articles endorsing the news of this new medicine, but truth is, we found anything related.
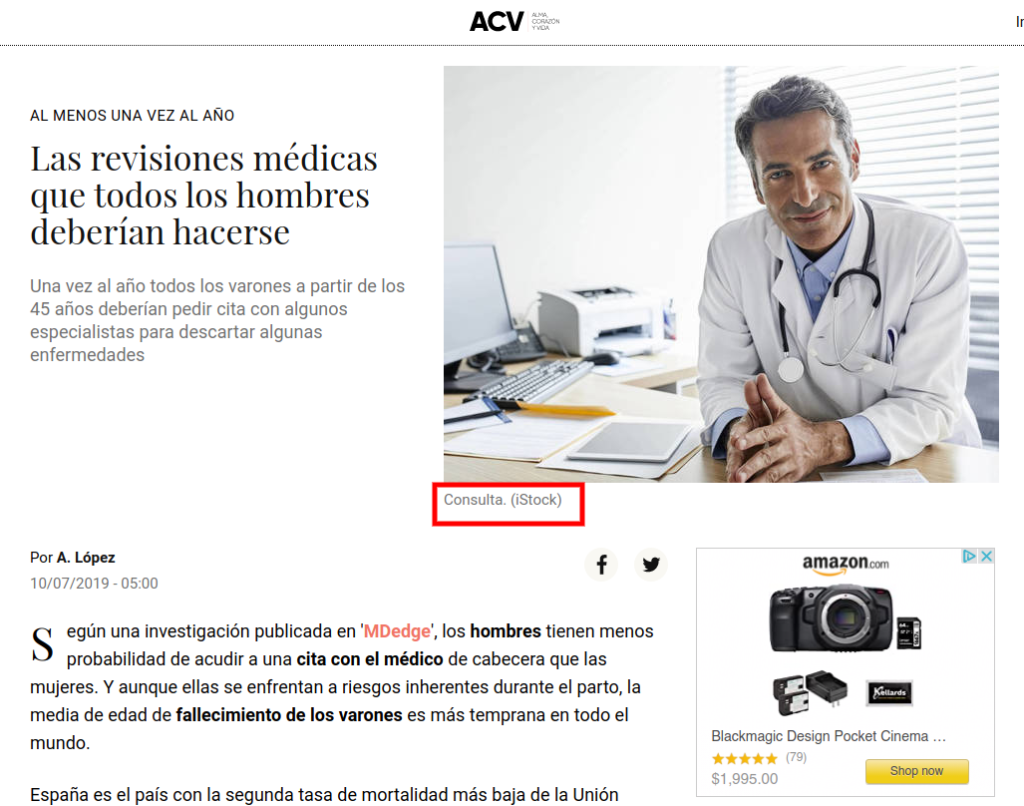
Instead, we found that this was a stock photo, a photo produced in a studio to be sold on gallery portals so that this content is used by people who do not have photos to fill their articles… It’s a Catfish.
At least one of the links where we verified the information had the decency to put that they got the pic from istock.
Special sell or single seller
Finally, to kill my curiosity, the article indicates that this medicine can only be purchased through this website since pharmacies stopped selling it due to its effectiveness. However, if you look for the product at mercadolibre (like ebay for LATAM), you realize that they also sell it there … BUT BEWARE … absolutely all sellers have the same photo of the product and there are no “real” photos of this product…
Of the 11 articles that offered this medicine, all were linked to only 3 sellers in total, all selling from the same location and almost with the same name… come on, if this were a revolutionary medicine, everyone would want to sell it. Right? Anyway, and to make the story short, when reviewing comments in detail we found the icing on the cake lost in a sea of false comments. “They sell counterfeit product.”
Just out of curiosity I searched at mercadolibre different countries website (it’s country located), and this medicine didn’t even exist. I also asked pharmacies if they had ever sold it, and neither… Verdict… it’s a Scam.
The point of this article is not to discredit the medicine itself, if you consume it and it does you good, fabulous, leave me a comment and that’s it. But the topic here is that’s it’s awful to share information about miraculous medicines that surpass a real medical evaluation, offering themselves as salvation in the middle of a pandemic where many are looking for an angel in the middle of their journey.
Have you found links like this? Tell me about! now you now know how to verify if this is a real or fake news.
This post has a nicer formatting that can be seen at it's original source at tatica.org , so feel free to hit the link and read better version!
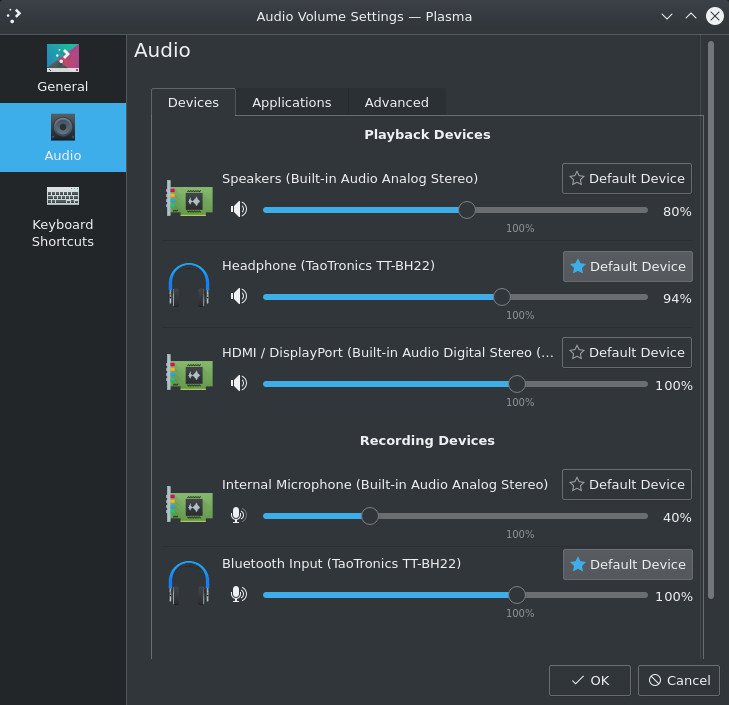
I’ve owned a TaoTronic TT-BH22 headphones with noise cancellation for a while ago, and I can tell you that despite being quite cheap have worked perfectly for me. Battery life is fantastic (around 40 hours) and noise cancelling, even if it’s not 100% perfect as the professional ones, is more than acceptable.

However, then I bought those I didn’t realize that they had an integrated microphone, and I think that during the first year of use I left this feature forgotten and unused since my SO didn’t recognized it right away. Sad thing is, it wasn’t until my husband tried them on his laptop and his SO recognized the microphone, that we knew about this.
And even sadder than that? We both use the same SO… so it was time to work around this and figure out why it was working on his laptop and not on mine, so if anyone has encountered an issue like this, here’s a solution that should work with every headphone with a built in microphone just like mine.
All problem was this: Like this headphones have a high fidelity sound (Hi-Fi) my system didn’t recognized them as regular headphones and “assumed” they didn’t had a microphone, that was it…
Now it was just time to configure correctly the headphone type, however, KDE’s Bluetooth config app is too simple and doesn’t allow more advanced settings, so I installed blueman, which is Gnome’s Bluetooth settings app and allowed me to configure easily my little gadget without going to the terminal. So lets install blueman as root:
[root@libro ]# dnf -y install blueman
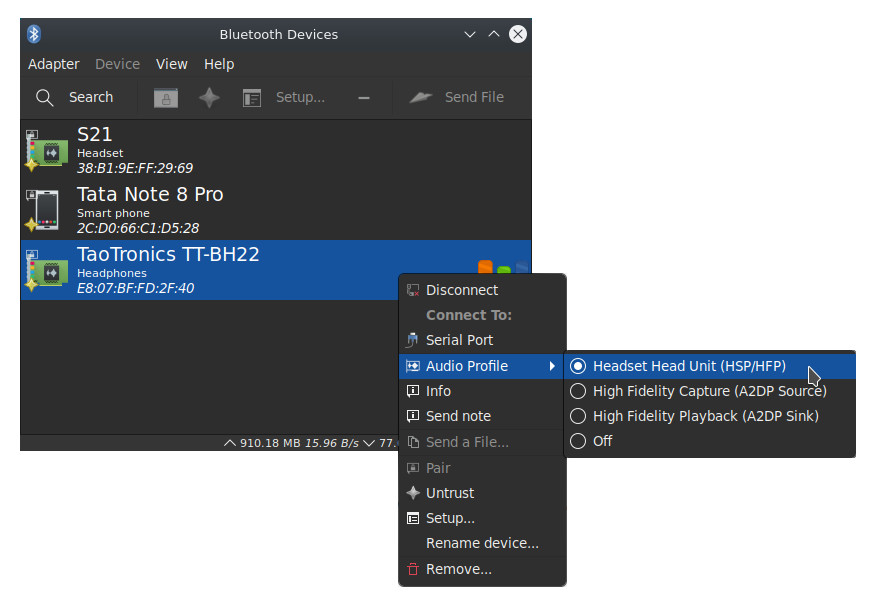
And with this app we can configure our Bluetooth devices better. when we open the app the first thing we see is the list of recent devices.
- We will locate our headphones on this list and right-click it to see the menu.
- Will select the option “audio profile” .
- And finally select the option Headset Head Unit (HSP/HFP).
And that’s it, you should be able to see your microphone between the audio device list and select it.
Now this happy girl can walk around the house while makes herself a coffee in between the million meetings we have now during this pandemic.
Let me know if this worked for you, and specially, which headphones did you configured so I can add them to this list.
- TaoTronics TT-BH22

This post has a nicer formatting that can be seen at it's original source at tatica.org , so feel free to hit the link and read better version!